Tuesday 31 May 2016

PCB Know How

Generic Standard on PCB Design (IPC2221A)

PCB
Rigid Laminate material (FR4, typically) consisting of a glass epoxy substrate clad with copper on two sides for double sides (0.062” typically)

PCB fabrication Gerber data requirement
1   1) Top Electric (Art work)
2   2)    Botton Electric (Art work)
3   3)    Top Slilk (Art work)
4   4)    Top Resist (Art work)
5   5)    Plated Through Hole (N.C Drill)
6   6)    Non-Plated Through Hole (N.C Drill)
7   7)    Board Outline (Art work)
8   8)    Drill Table

    Electrical Clearance
    AC and pulsed voltage > 200V must consider dielectric and capacitive effect of substrate in addition to spacing.
     
     Minimum spacing requirement according to withstand voltage are as below

Withstand Voltage (V)
Minimum Spacing (mil)
0 ~ 30
3.9
31 ~ 150
24.0
151 ~ 300
49.2
301 ~ 500
98.4

Electrical Isolation (Creepage Vs Clearance)
     Creepage is the shortest path between two conductive parts measured along the surface of the insulation. Clearance is the shortest distance between tow conductive parts measured through air.

     Copper Weight
     1 oz of copper will cover one square foot area when rolled out to a thichness of 0.0014 inch or 1.4 mil.
Copper Weight (oz)
Thickness (inch)
½
0.0007
1
0.0012 ~ 0.0014
2
0.0028

     PCB Surface Finishing
     Different types of PCB finishing are as below
     1)    Hot Air Solder Level (HAL or HASL)
     2)    Hard Gold-Electro plated gold
     3)    Electro Less Nickel Emersion gold
     4)    White Tin
     5)    Organic Solderable Preservative (OSP)
     
     The most common surface finishing we can see is Hot Air Solder Leveling. In this process, Panels are processed through a bath of molten solder, conversing all exposed metal surfaces. High pressure hot air, directed at both sides of the panel simultaneously, removes excess solder from the holes and surfaces.

     PCB Trace Width vs. Current Table
       A PCB trace width vs. current table helps you understand the relationship between PCB trace width and current carrying capacity so you can determine the required trace width for your printed circuit board design.


Monday 30 May 2016

Microphone Pre-amp

Low Noise Microphone Preamplifier Circuit


R1, R2, R3, R4 & R8 : Low excess noise metal Film
C1, C2 & C3 : Input and output coupling
C4 : Noise filter, C5: by pass
NOTE: Input Cable to microphone must be shielded

Sunday 29 May 2016

Relay Circuits

Momentary Relay Activation Circuit


Relay will energize momentarily until the capacitor is fully (or partially) charged.


Relay coil produce brief high voltage spikes when they are switch off and this can destroy transistors and ICs in the circuit. To prevent damage, a protection diode must be placed across the relay.

Controlling Multiple LEDs

Multiple LED Control Using Minimum I/O pins


Truth table for controlling six LEDs using three I/O are as shown below:

H = Output Set high (5V)
L = Output set low (ground)
I = Input

More LEDs can be controlled by using this equation:
Numbers of LEDs = (Numbers of PINs) x ( Numbers of PINs – 1)

For example:
Number of LEDs = 4 x (4-1)
                        = 4 x 3
                        = 12 LEDs

Speaker Volume Control Circuits

Speaker Circuit with Adjustable Volume Control


This is how we usually built 8/4/16 Ohm speaker with adjustable Volume Control. It can handle up to 15W speaker without any issues.

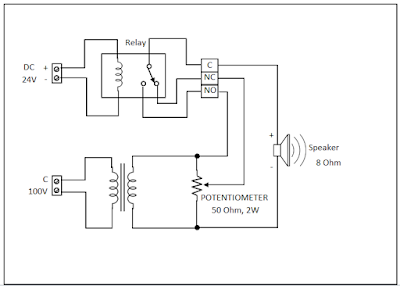
100V Line Audio Volume Control with bypass Option


This is 100V line speaker volume control with Emergency bypass. It requires DC 24V to bypass the audio level control.

Buzzer Control

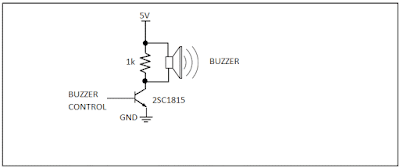
Simple Buzzer Control Circuit


This is a very simple buzzer control circuit with one resistor and transistor.

DC Motor/ Fan Monitoring

DC Motor/ Fan Failure Detection Circuit


Rsense = Sensing Fan Current
R1 & C1 = Establish an average DC level at the mid point of the transistor of the current waveform and apply this voltage to the base of Q1

This DC motor/fun failure detector checks for the fluctuation in current through Rsense. A static current causes the output to go high, indicating a failure.

Saturday 28 May 2016

Earth Leakage Monitoring

Earth Leakage Monitoring Circuit for 100V Audio Line


Digital Input Sensing

Digital input/ Dry Contact input Sensing Circuit


When NC (normally close) is detected at the input, microcontroller will receive Low (0V) signal and that will be high (5V) for NO (normally close).

Short Circuit Monitoring

Comparator Circuit for Open/Short Detection


At open circuit condition across +/- of the input connector, V- will get around 5.1V. Since V- (5.1V) is greater than V+ (2.5V), output to the microcontroller will be Low (0V).

When the short circuit is detected across +/- of the input, V- will get less than 2.5V which will make the output to go High (5V).

This circuit can be used for simple continuity test circuit by connecting LED and Buzzer at the output. 

Telephone Ring Detector

Analog Telephone Ring Detector


When this circuit detects the telephone ringing signal across tip and ring (60 to 105-volt RMS 20-Hertz sine wave), it will trigger the Optocoupler's phototransistor output and provide Low (0V) signal to microcontroller. Otherwise, it will give High (5V) to microcontroller.

12V Zener is added to prevent fault triggering from unwanted signals. 0.1uF, 250V capacitor is used for DC blocking and 10k 0.5W resistor is to limit the current passing through the optosiolator.

This circuit can drive relay or can be directly interface with any other outputs such as LEDs.

Fuse Monitoring Circuits


AC Fuse Monitoring   


This is a simple AC Fuse monitoring circuit, which will give Low (0V) to microcontroller when the Fuse is Okay and give High (5V) if the fuse is faulty.


This DC Fuse monitoring circuit will give High (5V) to microcontroller when the monitoring fuse is Okay and gives Low (0V) when is fuse is faulty.